onsdag 21 september 2016

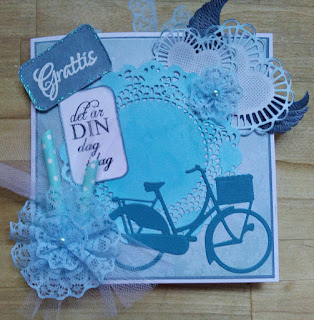
Grattis!

Hej!

Här kommer mitt bidrag till månadens tema: Grattis :-)


Det är min favvo-vikning som ger en "vinge" till på kortet. :-)

Motivet kommer från Whimsy stamps. Det är färglagt med samma fantastiska (!) och mycket prisvärda pennor som sist: mina Marco Raffine. Textstämpeln till vänster är från ett set med clearstamps som också är riktigt prisvärt. (ca 22 kr för ett a6 ark, fyllt av stämplar)

Grattis-Texten är gjord med en Dymo etikettgrej inköpt på Claes ohlson (denna kallas Dymo Omega), och är riktigt nostalgisk, tycker jag ;-)

Blommorna är gjorda med två olika silikonformar och polymer clay. Den ena formen är från Martha stewart och den andra är en billig variant, men ack så fin den är:-) Leran är färgad med distress inks. Den mörknar något när den torkar, så man behöver inte färga den riiiktigt lika mörk som man vill ha den. Pearlsen kommer också från riktigt billiga ebay-klipp. 

Vänster insida


Höger insida (till vänster ser man själva mitten av kortet, och där skriver man sin hälsning)

Hela insidan

Det var allt för idag! Ha det gott!


Note: This Post might contain affiliate links.

fredag 19 augusti 2016

Hej!

Idag  är det min tur att visa upp mitt bidrag till månadens tema hos scrappaloss.blogspot.se: Samma Stämpel! Jättespännande! Och faktiskt lite klurigt... Denna fina stämpel är inte alls lik stämplarna jag har i mitt förråd. Jag tycker att den är jättefin, jag har bara inte vetat vad man skulle kunna göra med den här typen av motiv. Man är nog lite vanescappare :-D Så nu kan jag säga att jag är jätteglad för att jag fick möjligheten att testa på att pyssla med detta motiv!!!

Det är jättekul att få se hur olika vi har tolkat samma stämpel, de olika tekniker vi har använt till färgläggning och vilka olika effekter man kan åstadkomma med samma motiv!

Detta är min tolkning:


Jag har kört en vanlig 6x6"  kortstomme, dekorerad med ett motivpapper från studiolight. Stämpeln är färglagd med mina färgpennor från Marco Raffine färgpennor  (72 pennor för ca 200 kronor).  Motiv utstansat med dies från cheery lynn/crafty ann. Även stämplarna kommer från ett set inhandlat mkt billigt på ebay (under 25 kr!)

Trevlig helg!


Note: This Post might contain affiliate links.

tisdag 5 juli 2016

Tips på fantastisk spets till superpris!!!

Hej!

Jag erkänner: Jag gillar att göra klipp. Jag gillar att hitta det jag behöver till ett bra pris... :-)

Ett exempel på detta är spetsband. Jag har köpt detta på ebay till toppenpris! Det finns i en uppsjö av färger och mönster etc. Nu kanske du undrar vad jag använder spetsband till? kanske inte låter särdeles användbart, men det är det verkligen! Jag brukar göra spetsblommor. De är jättefina, tycker jag. jag länkar in en youtube tutorial, så att Du ser hur man gör dessa. I mitten sätter jag en 6 mm halvpärla. ska testa med 8 mm halvpärlor och 9 mm pärlemor-knappar också. Även detta klickar jag hem till toppenpris på ebay.  Spetsen säljs om ca 9 m och kostar ca 8,50-9 svenska kronor, lite beroende på växelkursen.


Kom ihåg att även om det låter lite ovant att handla från andra länder, kanske framförallt ända från asien, så är det inte knstigare än  att handla från sverige. Största skillnaden är att det är billigt (!) och tar lite längre tid, ca 2-4 v.skulle det vara något krångel,  så lämnar både ebay och paypal garanti,så du har minst lika bra köpskydd här som inom sverige.

Nu blev det en väldans mycket text, men här kommer youtube-videon och några bilder på ett kort på temat "tags" som är månadens tema hos scrappaloss.blogspot.se Detta är  en av mina absoluta favoritvikningar. har inte gjort den på ett tag, men det är en rktig favvis!!!


Övrigt material är:
Vingar Cheery Lynn Dies i  två storlekar
Spetsen och halvpärlor ovan
Sugrör Duni
Spellbinders romantic ovals
tårtpapper die joy crafts
hjärtan dies cheery lynn
cykel die marianne design
tags sansade med nellie snellen dies
Punch tonic studios geared punches till kanterna på fickorna till tagsen
öljetter
tyll

Note: This post might contain affiliate links.

Ha det gott!!!
HolyScrapbook!!!


onsdag 9 mars 2016

Graffiti text to a 10 year old

Cool graffiti card to a ten year old boy. The text "Grattis" means Happy Birthday :-)

onsdag 17 februari 2016

HTV print with Annabella and Lucita fonts!


This is a HTV (Heat transfer vinyl) print made with only three different fonts. "Life is" is written with the Annabella font from the hungry jpeg.

I have also used the Lucita font, and that one is also avilable from the hungry jpeg.

Make the most of each day is written with the free windows font Arial :-)

To make sure that the Annabella font would cut well (even though it has got alot of very thin lines), I made a small offset around it. That resaulted in the text on the image above. It is an easy, peasy and fun way to make sure that you can use your favourite fonts in many more cut outs, than you'd think.

Hope you have got some new ideas :-)

This post might contain affiliate links.


måndag 15 februari 2016

Shaker card tip :-)

Hi Y'all!

Today I am not going to share a card, as usual, with you. Instead, I am going to share a few tips regarding shaker cards :-)

They are pretty cool, and can be made in soooo many ways. I have just started to develop my passion for shaker cards, and there is somuch out there. Specialty tools, pockets, silverflakes, mica beads... they all cost a bit, especially if you want a few different colors. Maybe you just want to try it out and se if you like it??? 

Ok, here goes...

Decrations, to fill up the shaker pocket:

1. If you want silverflakes in your shakers. Use aluminum foil! I just tare small, irregular pieces, and pop into my cards. Just make sure they are small enough.

2. Glitter. Use cheap glitter. No need to only use the more expensive brands if you find a nice cheaper alternative in the childrens toy section in the supermarket... or maybe on ebay (just make sure to check the amount  you get because sometimes the packs are small, so make sure it tells you how much is in the auction)

3. Mica beads (these lovely guys does not have any hole in them. They look like tiny balls of glass. I buy these super cheap on ebay. This is where I bought them: http://pages.ebay.com/link/?nav=item.view&id=121773354788&alt=web 
I have used white opaque, and the really light blue one, with rainbow shine to it. They are awesome to create a snowy effect ;-)

4. Sequins. these guys, just like glitters can be found in so many places. I have  bought some off ebay. In the image above, I have used blue and silver star shaped sequins. They are only 3 mm in size. I have also bought 4 mm classic, round sequins with a rainbow shine to them.

Ok, let's get on with it and take a look at the shaker card pocket itself:

There is no need to buy expensive machinery if you just want to make a few cards, or try it out and see if you like it. What you might need is this:

1. Acetate. The clear plastic in the front. Could be bought or maybe you can use some old packaging..?

2. If you wan the pocket to have dimension to it, so the filling easily moves around, you need something to create the space. Could be a piece of foam sheet, some foam tape or something like that.

3. A nice glue! Something that will hold the actate really good. I do not recommend a glue gun because it is to difficult to get it smooth all the way around. It bulks up, and looks... not very nice, at least when I have tried it. I use some all purpose glue from the hardware store, that is ment to hold plastic. Then just make sure to get it closed completely, so that nothing sneaks out a small hole somewhere :-)

4. when it comes to shaping it all, you can use almost anything... a die cutting machine (sizzix big shot, cuttlebug...) and some shaped dies in the sizes you like will work fine. It is also possible to cut it wih scissors. You could use an electronic cutting machine if you have one of those (like silhouette cameo, portrait or curio, or from another brand...) you do not need any special tools to make shaker cards, and then, if you like it, you can buy them later on.

Feeling like you wanna give it a go now? Good Luck and happy crafting!

fredag 5 februari 2016

Oak tree girl again :-)

Here comes oak tree girl again :-) it seems like this is my favourite digi-stamp right now ;-) as I wrote before, you'll find this cutie at weestamps.com  for 1.85 £.

This time it is made with a card base from Anitas, an old cardstock from a panduro cardstock pad, a lovely design paper from craft and you (vintage time paper pad).  

Some lovely two-colored roses from ebay, and leaves die cut with a marianne design punch die and some grassgreen playcut paper, decorates the corner of the image. 

The image is coloured with inktense pencils, I just love them!

Behind the image, there is a lovely die cut circle made from a marianne design die. It is from Anjas vintage designs, and it is a kit with this one and an old fashioned crown.

Some  glitter on the roses made a huge difference, and it was achieved by painting along the edges of the crown leaves with a sakura gellyroll glitter pen. 

These contain alot of glitter, and last a long time, they are a good investment, and not at all that pricy! One pen costs about 29 sek, that means about 3-3,5 usd. They really  last a long time. When I want to add glitter with my derwent waterbrush, I just paint some of this glitter out on a baking sheet or paper, and then just pick it up with my pantbrush. It lasts a long time,  you can adjus the glitter amount, and  it looks like you have used some kind of expensive speciality pen, like wink of stella or spectrum noir glitter pens :-) just a tip.

The text "Du är Bäst!" means "You're the Best!". it is stamped with versamark ink and embossed with cosmic shimmer fine detail true white. This is the first white embossing that I have that really melts together perfect!

Have a lovely weekend! And you know what happens this tuesday??? In Sweden we are celebrating "fettisdagen". It means that we eat these lovely baked goods, with almond and sugar in the middle of the bun. yum!  

This post might contain affiliate links.